Tuesday, September 27, 2011

Garage Makeover

We transformed our garage into a playroom a number of years ago. We had the idea of doing it right after Bear's Hannah Montana birthday party. We had put carpet in the garage for the dance party and then loved having the extra room that we decided to leave it that way.

Unfortunately we just have too much stuff and our garage ended up being a "dump" zone. We would clean it up and it would look nice again but then it would get messy again. I mean seriously look at how bad it got at the beginning of summer. Yes, that is a piano in our garage. Don't ask.

We ended up doing a garage sale and made a good profit to renovate our garage. Plus we found an amazing deal on this shed. It's a $700 shed that we got for $180 on craigslist. I have been looking for years for a shed. My love worked hard and put it together. We loaded a lot of stuff into it and then were able to start on our garage.
 

The plan for the garage was renovating it into a playroom / sewing room / man cave my hubby and his buddies. I have a really hard time committing to colors. I absolutely love bright colors but the problem is I love to many color schemes. I decided that the first thing I needed to do was pick out the colors I wanted in the garage. I decided on these fabrics. I thought pops of orange and lime would add some funkiness to the garage.

Here is what our garage looked like in the very beginning.

And here it is now. So exciting. I LOVE the way it turned out. We got everything for super cheep or free which makes me love the transformation even more.

We got to re-carpet the entire garage. Someone we knew had some connections with a guy that was getting rid of 2 year old carpet and padding.
 
The couch we got at a rummage sale for $4. It was an old couch from a youth group room. Not so pretty but super dooper comfortable. I made some pillows to spruce it up a little.

This SA-WEET orange recliner we got from craigslist. We actually found this recliner on craigslist after we were done with the garage but when I saw it for $5 I had to have it. It was perfect. Nothing yells out "Man Cave" like an orange recliner. The lady was just happy to get rid of it that she ended up giving it to us for free. My love LOVES this thing.

The door well other than paying for the tiny $2 samples of paint it was free too.

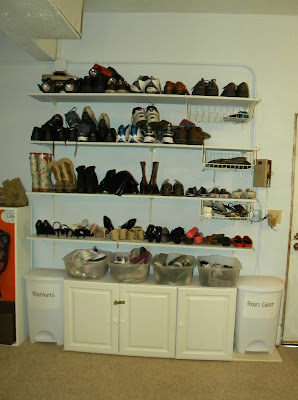
This side of the room is way more organized too.

Our more than organized shoe shelf. Not many changes in this area.
 

The lockers...you all know these were free. And the bike rack we got a while ago.


Now for the other side of the garage. The organized shelves. We were able to put an entire gorilla rack in the shed so that gave us a ton of extra space.

Okay this is the most exciting part. At least in my opinion. Its my personal favorite part of the garage. My sewing area which is hidden behind the couch. I turned my old sewing chest that was in our kitchen into a toy box for the kids. Just painted it lime and had my love put some new slow closing hinges on it. It works perfect and holds a ton of toys.

My sewing desk was a garage sale find. The cabinet drawers were from craigslist and fit perfectly under my desk.

My new sewing cabinet was also a craigslist find. It was exactly what I was looking for. I was so excited when I saw this. It fits all of my things perfectly. I spruced it up with some clearance boxes I got for $2 at IKEA and one of the buttons from Bear's Runway party.


I loved how everything came together. Our family is constantly out in the room. It literally feels like the fun room and we are always hanging out out there. My love and I sit out there just to talk about our day and we have even had a movie night already out there.

I'm so glad it turned out like I had imagined. Now if I can only get my bedroom done.

Sunday, September 25, 2011

Switch it up

 When we were renovating our garage. I made myself a sewing area. I happen to be at the craft store one day and this caught my eye.

 It was originally $19.99. Then clearanced down to $5.00 and then 75% off of that. So for $1 and some change I couldn't pass it up. But what was I going to do with some wooden letters that said "SMILE"?
 Then it came to me. Take out some letters and switch up the others. I took out the "L & I" and turned the "M" upside down and got  "SEW." Perfect! Right? I painted the letters and set them up. I really like the way it looks.


Monday, September 12, 2011

Before and After

A while back I was driving home and saw a "FREE" sign on something on the sidewalk. I always get a little excited when I see signs that say "FREE." Usually its junk but this time it wasn't. At least it wasn't to me.
Actually there was 3 of them that were sitting out on the street. I'm thinking they were shelves but I didn't quite know. Anyway I told my Love about them and he went and picked them up for me.

I didn't end up using them right away for what I had planned (which I will get to) but I did make good use out of them while they were sitting in my garage. I used them for each of the kids birthday parties. First for Bear's 50's party. A record display and jukebox stand. 


For Big Guy's Lego Party they were made into giant Lego's.


And for Monkey's Monster party I used one of them for pin the eyeball on the monster.

So hey, I didn't get to my project right away but I did make good use out of them. Okay back to my great plan for these things.
I had mymy Love take off the random diagonal board on the back and nail a backing to them. He sanded them down for me and I primed and painted them. Pretty soon these..... 

Turned into these. Wa-La.....Lockers for the kids. Are you as excited as me? I have been wanting to have some sort of place for the kids to put all their backpacks and sweatshirts after school and knew these would be perfect. I love the way they turned out.

 Not sure what the fourth one will be for. Right now the kids say its daddy's locker.


The kids are lovin' them too. Everyday they come home to this sign that I made.


And within a few minutes I see this.


Goodbye to backpacks and sweatshirts on the floor! Hello to a very happy mommy.

Monday, August 29, 2011

Project Runway Birthday Party

Bear had her birthday party a few weeks ago. Since she loves to design clothes she knew she wanted to have something with a design theme. Finally it was decided. 
A PROJECT RUNWAY PARTY.

First off we had to make the invites. I decided to try and make a magazine cover. This is what I came up with.
The Front

The back


 As usual there was a lot of prep involved. First I started off with the traditional birthday banner. But this time I made the banner look like a bunch of little dresses. You can't see it that well but this banner says "____'S YEARLY FASHIONS." Then above it I put a picture of ages 1year through 10 years above it. This was her decade birthday and I wanted to make it special.


For the rest of the decor I bought different kinds of fabrics and cut out a bunch of poster board templates and then covered them with  the fabric. Then stuck the dresses on the walls as well as cut some circles out of paper to look like buttons.

My Love and I had just went to IKEA and found some cork trivets that I ended up painting to look like giant buttons too.

A little more fun miscellaneous decorations included these marshmallow treats that my mom made. The girls loved them.

My mom also made these cute little waters to go with the party. 


I had the invitation blown up at Kinko's for $2 and put one of Bear's designs next to it.
  

This year for the cake I was going to try and attempt to make a 3D dress form but didn't want to mess with fondant so I opted for a runway.

The entire table scape.

And of course we couldn't have a Project Runway Birthday without a runway. With some staging from our church, a couple of tents and some sheets. Wa- la we had a runway.  


This is the welcome sign that the guest saw when they arrived at the party sign.


When all the guest arrived we started out with our first thing on the agenda. Bear has never been fond of games at parties. She is more of a craft girl. So for the craft I tried to find a no sew project. I wanted to stay with the design them. We ended up making some no sew totes. The whole tote is made out of knots.

After the totes were done each of the girls did do a little sewing. I had them make a felt flower and sew a button on it. This was Bear's finished tote. Cute right? Just 3 knots!


After the totes were made came the Project Runway Challenge. It was soooo much fun. Each of the girls were handed a bag


Each bag was filled with these exact same supplies. I also had a "community" bin that was filled with high heels, different colored duck tape and a few other supplies that anyone could use.
After each designer had their bag they were told that they had 35 minutes to design an outfit that they had to model down the runway. Luckily some of the high school girls from our youth group stopped by and helped the girls. Each of them designed their own outfit.

My Love was the host of the fashion show. He did great.

Bear started the show off with her design and her trademark pose.


 The designers all modeling their designs.


 Then it was time for the guest to leave each of the girls got one of these cookies that I tried to make look like dresses.

We attached them to some design kit things that we had gotten from the dollar store wrapped in fabric. Bear also designed a hair clip for each of the girls and attached it to the favor. They also of course took home their homemade purses as the part of the favors.

Saturday, August 27, 2011

Ikea Makeover

So guess what?! I went to IKEA for the first time this weekend! My Love and I just decided to have an IKA date. It was super fun too. So many things to look at.

We weren't going to IKEA for anything special but then I saw these. They are trash baskets.

I have been looking for new wall pockets for a while. I made these a while back for the kids. Its a place for them to put all their school papers and homework folders in. I got so tired of them all over the counter. 

I really liked this system. It was working great but every time we opened the refrigerator we seem to open it a little too wide and they were getting cracked and busted up.

So out with the old. 
And in with the new. Thanks IKEA. I just hung them on the wall but leaving the top part empty I laminated some scrap paper with the kids names on it and placed it on the top of each trash can. These ones are so much more roomier for the kids to put all their paperwork, folders and even books in.


Another special find was these cork trivets. They were super cheap and I had been looking for something that was a circle just about this big too. It was for Bear's Runway birthday party. I saw these and knew they would be perfect. 

And they were. They made perfect giant buttons. Here's a little sneak peak of Bear's birthday party.